nanDECK - Tutorial A
This tutorial was written for nanDECK 1.8 (or later). It features creating a
sample deck (for a non-existent game).
Click on "New deck", leave all options on default and then click on "Save as",
choose a fancy name like "Tut_A" and confirm. You are now in the editor, delete
all rows (yes, we start from an empty script). The defaults are: card size 6
cm x 9 cm, A4 paper (portrait orientation) and 1 cm borders.
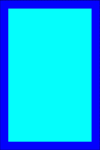
First, we want a background and a border, we can use two rectangles
for these, so we write:
RECTANGLE="1-10", 0, 0, 6, 9, "#0000FF"
RECTANGLE="1-10", 0.5, 0.5, 5, 8, "#80FFFF"
This script creates a deck of ten cards ("1-10"), with a blue
rectangle (#0000FF) starting from top left (0,0) to bottom right (6 cm width,
9 cm height). Over that, we draw another rectangle (cyan: "#80FFFF"), starting
from 0.5, 0.5, smaller (5 cm width, 8 cm height) so we have a border of 5 mm
all around. This is a card:
Let's add some gradient to the background (from cyan to white):
RECTANGLE="1-10", 0, 0, 6, 9, "#0000FF"
RECTANGLE="1-10", 0.5, 0.5, 5, 8, "#00FFFF#FFFFFF@270"

Or a double gradient (two inner rectangles, from cyan to white,
and from white to cyan):
RECTANGLE="1-10", 0, 0, 6, 9, "#0000FF"
RECTANGLE="1-10", 0.5, 0.5, 5, 4.01, "#00FFFF#FFFFFF@270"
RECTANGLE="1-10", 0.5, 4.5, 5, 4, "#FFFFFF#00FFFF@270"

Note the 4.01 for the height of the first rectangle, with
this correction it overlaps the second, otherwise you can see a nasty blue line
between the two.
By now, we have repeated "1-10" on all cards, we can use a label:
[alldeck]="1-10"
RECTANGLE=[alldeck], 0, 0, 6, 9, "#0000FF"
RECTANGLE=[alldeck], 0.5, 0.5, 5, 4, "#00FFFF#FFFFFF@270"
RECTANGLE=[alldeck], 0.5, 4.5, 5, 4, "#FFFFFF#00FFFF@270"
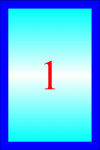
Let's add some text: we create now a suite, from one to ten.
We use a FONT and some TEXT directives:
FONT="Times New Roman", 72, "T", "#000000"
TEXT="1", "1", 0, 0, 6, 9, "center", "center"
TEXT="2", "2", 0, 0, 6, 9, "center", "center"
TEXT="3", "3", 0, 0, 6, 9, "center", "center"
...boring, uh?
We can dump all TEXT and use only one directive with a sequence,
like this:
FONT="Times New Roman", 72, "T", "#000000"
TEXT=[alldeck], "1|2|3|4|5|6|7|8|9|10", 1, 1, 4, 7, "center",
"center"

I've chosen Times New Roman, 72 (in DPI is one inch), black
and transparent (so we can see our fancy background).
We want now three suits of cards: red, green and blue (all of them from one
to ten), so we need six rows of code:
FONT="Times New Roman", 72, "T", "#FF0000"
TEXT="1-10", "1|2|3|4|5|6|7|8|9|10", 1, 1, 4, 7, "center",
"center"
FONT="Times New Roman", 72, "T", "#00FF00"
TEXT="11-20", "1|2|3|4|5|6|7|8|9|10", 1, 1, 4, 7, "center",
"center"
FONT="Times New Roman", 72, "T", "#0000FF"
TEXT="21-30", "1|2|3|4|5|6|7|8|9|10", 1, 1, 4, 7, "center",
"center"
Now we have thirty cards, so we must adjust [alldeck] label:
[alldeck]="1-30"
For a better reading, we can cast a shadow under the numbers,
with another couple of FONT/TEXT lines, the shadow must be under the numbers,
so we add it before them in the script:
FONT="Times New Roman", 72, "T", "#000000"
TEXT=[alldeck], "1|2|3|4|5|6|7|8|9|10", 1.1, 1.1, 4, 7, "center",
"center"
Note the position (1.1,1.1) 1 mm to the right/down.
You can use the same sequence for all thirty cards because
it repeats itself after the tenth element, so you can avoid to use a sequence
like this: "1|2|3|4|5|6|7|8|9|10|1|2|3|4|5|6|7|8|9|10|1|2|3|4|5|6|7|8|9|10"

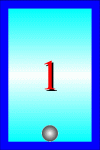
Now we can add some other element, like this image:

I want to put one image on cards 1-3, two on 4-6, three on
7-9 and four on 10 (on all three suites). I can use many IMAGE directives, or
only four PATTERN:
PATTERN="1-3,11-13,21-23","dot_black.gif",1,0,7,6,2,1.5,1.5,0,"T","center","center"
PATTERN="4-6,14-16,24-26","dot_black.gif",2,0,7,6,2,1.5,1.5,0,"T","center","center"
PATTERN="7-9,17-19,27-29","dot_black.gif",3,0,7,6,2,1.5,1.5,0,"T","center","center"
PATTERN="10,20,30","dot_black.gif",4,0,7,6,2,1.5,1.5,0,"T","center","center"
Quite complex, but a powerful command: note the various ranges
and the number of images (the third parameter) for each set of cards. The other
parameters are used for the position, starting from (0,7), width 6 cm, height
2 cm (this is a rectangle at the bottom of the card), the dots are 1.5 cm x
1.5 cm and centered (both horizontally and vertically) in the rectangle.

You can download the script here,
the "dot_black.gif" image here, and view the PDF
here.
Stay tuned for the next tutorial, I'm waiting for question
and advices from you.
/\/and